|
Housing and Equipment
Outdoor Hutches,Indoor--All Wire Cages,Cooling,Epuipment
The First mistake, and one of the worst, the beginning rabbit breeder can make is in buying rabbits when he doesn't have the housing ready and waiting for them. This necessitates the use of temporary quarters. All to often, the temporary accomodations end up becoming the permanent housing,and the rabbits wind up living in poorly constructed quarters, with damp, drafty winds whistling throught in cold weather.
Here is some good idea's for Hutches !!!!!!!!!!
| Outdoor hutch |
|
| Outdoor Hutch |
|
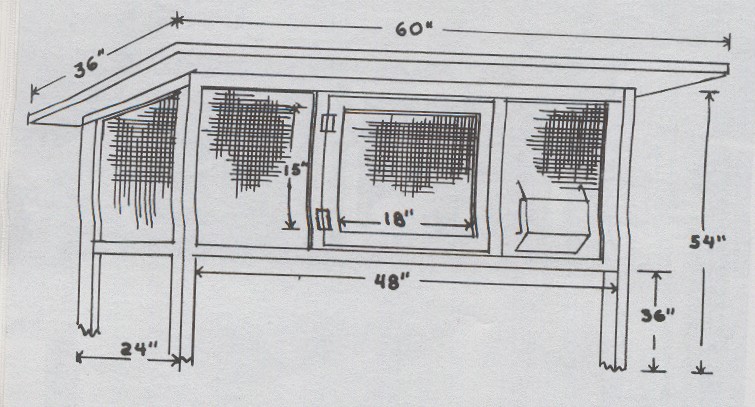
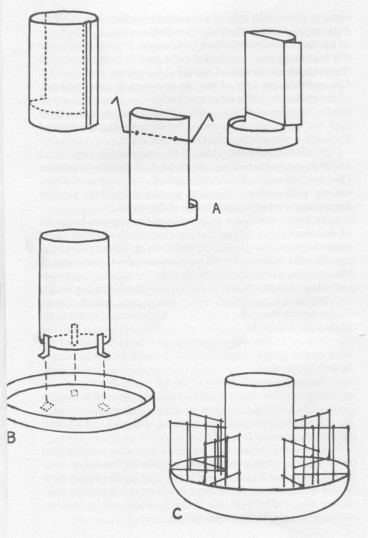
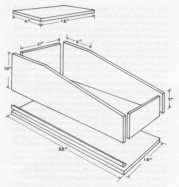
Here's a different approach to constructing an outdoor hutch using wood for framing and rabbit wire for caging. The basic unit (A) provides four cages, but this unit can be doubled to provide eight cages or stacked in single or double arrangements to provide eight, sixteen, or even more cages (B).
| Outdoor Hutch |

|
| Indoor and All Wire Cage |
|
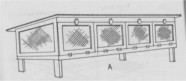
The all- wire cage is widely regarded as the ideal rabbit housing. And the all- wire cage isn't all that difficult to make. The wire is joined at seams using J- clips, which are fastened using special pliters. For each cage, you need eighteen feet of twenty-four-inch-wide wire.Cut off two thirty-six-inch lengths for the floor and roof. Cut off a twenty-four-inch length for the door. Then lay out the remaining piece of wire and, using a board for the straight- edge, bend it into the sides of the cage. Measure thirty-six inches from one end and bend, then measure another twenty-four inches and bend, then thirty-six inches and bend. Use the J-clips to join the ends and attach the roof. Attach the floor six inches from the bottom of the sidewalls, so the cage measures eighteen inches from floor to roof. Cut an eighteen-inch-square hole in one long wall for the doorway, then attach the piece of wire that's the door so that it overlaps the opening on all sides.
Cooling
Shade: If at all possible, any structure used for housing rabbits should be located in the shade of trees.Of course, this is not always practical. Many rabbit raisers without benefit of trees shade their rabbit hutches with vines to shade rabbits, one should choose plants that are as resistant as possible to insect infestations.
In the southern and central states, the silver lace vine is thought to be a good plant for this type of shading. Some of the ivies are also considered as useful. One should steer clear of the squash vines, due to their insect populations, unless one is prepared to use insecticides.Remember that rabbits,like other animals,are susceptible to poisoning from insecticides.
In some instances wisteria vines are used for shading rabbit hutches, thought these are normally a slow-growing plant. Find out from residents in your own area just which vines are hardiest for that particular region and have the least trouble with insects.
Fans: Where shade is not available, use fans or other means of sheltering rabbits at times from the heat of the summer sun. Electric fans are used extensively in many parts or the country . Place the fans so that there is never a draft blowing directly on the rabbits. Drafts at any time of the year can cause tespiratory problems in the animals.
In small buildings, one exhaust fan is often sufficient. Place it in an opening in one end of the building, directly opposite another opening in the other end of the structure. This creates fresh air circulation by pulling outside air through the building, rather than blowing air into the barn.The major concern is not so much actually cooling the air as it is keeping fresh air curculating through and around the cages.
In the very large barn , and especially in a metal barn, both intake and exhaust fans may be needed, It is often helpful to close all openings along the sides of the building, using exhaust fans in one end and opening windows wide along the opposite end where the intake fans work. This creates an air flow that benefits rabbits through the full length of the rabbitry.
Raisers in extremely hot areas with low humidity make use of water evaporation and fans. A cooling pad is built into one end of the structure, with one or more fans built into the opposite end. Air is pulled through a wet cooling pad, which lowers the temperature inside the building by several degrees. This type of cooling procedure is not practical in those areas having high humidity most of the time.
Sprinklers: Another cooling method is also useful in certain areas- the sprinkler system. This is a simple procedure if one has a sufficient supply of water. A garden sprinkler is placed atop the building, and when temperatures reach the upper 80's and 90's, water is turned into the hose. The pressure is kept fairly low so that water tends to dribble down over the roof, dripping off the eaves. This will offer some measure of cooling to the building.
| Equipment |

|
All-metal feeders such as this can be purchases from a number of manufactures. Or, if you are handy with metal, they can be constructed in the homestead shop. In either case, the feeder in actual use is attached to the hutch in such a way that the trough juts into the rabbit's domain and the feed hopper is outside the pen.
| Feeder |
|
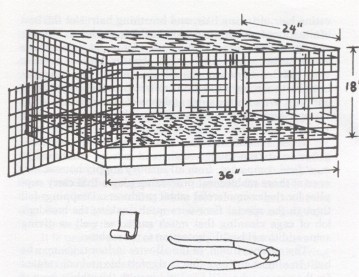
A high- capacity feeder much like the commercially made models can be fabricated from wood and metal as shown. Cut the parts and fasten them together. The trough is slipped through a rectangular hole cut in the side of the hutch so the rabbit can feed easily. The hopper remains on the outside of the hutch, easily accessible to the homesteader. Any fine matter in the feed will sift through the screened bottom.
| Home Made Feeder |
|
The coffee can is riveted to three thin strips of metal; these metal strips are in turn riveted to the bottom of the cake pan. The two utensils should be separated by about one inch of clear space, so that feed can slide down into the cake pan, which serves as the feed trough. After the can and the cake pan are joined with rivets, a small hole is punched in each side of the top of the can. Strong wire is fastened through the holes, forming a bail such as those on buckets. Another strong wire is attached to the top of the rabbit cage. Loop the lower end of this wire around the "bail" of the feeder, being sure that the feeder can be reached easily by the young rabbits but not be low enough to allow them to climb into the feeder trough and soil the feed. Some feeders are handmade of part wood, part metal. When wood is used in making feeders, no wooden parts should be accessible to the rabbits. It doesn't take a litter of rabbits long to chew through the sides of an all-wood feeder. The trough, or hopper, of a part-wood feeder should always be made of smooth metal. A wooden feeder is not only more trouble to make; it is also less sanitary than the all-metal feeder. Coffee cans can be turned into a variety of rabbit feeders by the handy homesteader. As shown in A, the can can be cut along the seam and around the circumference near the base. The resulting flap is bent flat across the new opening and pop- riveted to the side of the can. A length of wire run through two holes in the can is used to secure it to the hutch. Figure B shows how to make a freestanding feeder. Cut out the top and bottom of the can, pop-rivet three right-angle tabs to the sides, then to a round cake pan. Be sure to leave space between the bottom rim of the can and the flat surface of the cake pan. In figure C, the can is fastened, as in B, to the bottom of a metal bowl. Then pieces of wire fencing are soldered to the can and the bowl to split the bowl into feeding sections.
| Homemade Water |
|
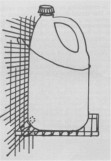
| A waterer made from a plastic jug and a dewdrop valve. |
| Waterer |
|
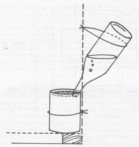
A really simple waterer can be made from a peanut can and a soda bottle. Wire the can to the hutch on the inside. From the outside, insert the neck of the bottle through the hutch- wire into the can. Wire it to the hutch.
| Hayracks |
|
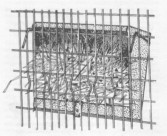
Commercially made hayracks are available, but it is easy to make one. Construct a small box of 1/4 inch plywood, leaving the top open. Attach a small tab the center of the bottom of the opening and run a length of wire through a hole in the end at the top. Rest the tab on the hutch wire, swing the opening of the hayrack against the hutch and hook it in place with the wire.
| Nestbox |
|
A nest bos is a vital piece of equipment, and one that is easily made from a piece of plywood. The parts are cut to the dimensions indicated and nailed together using 8d nails.
|
